Xcode11 storyboardなしで始める開発の初期設定メモ 前半
2020-06-11

どうもこんちわ、しょーです。
コーヒーこぼしました。
Macは無事ですが、私が犠牲になりました。
飲み物こぼした時の圧倒的絶望感ですよね。
洗濯物夜まで乾くかなぁ。
始めるか。
よくテストアプリやストアに公開しない自分用のアプリ作ったりちょいちょいするんですが、最近は基本的にStroyboard使わないんですよね。
業務でも基本使いませんし(たまにそっちのが効率良い時は挿入するけど)、基本的には SnapKit を用いてレイアウト組むことが大半です。
宗教的な部分になるのでこの辺にしておこう。
大体初期設定というか、大枠構成を作成してひとまずビルドするまでを作る過程は同じなのでメモがてら残しておこうと思います。
どちらも結局メリットデメリットはあるので好みということもありますが、個人的にはstoryboardなし設計の方が気に入っています。
目標
- storyboardなし設計のビルド環境を構築する
- ナビゲーションバーあり
- タブバーあり
オーソドックスな上記の環境でビルドまでを目標とします。
SnapKit 導入はライブラリ入れるだけだから別にいいかな、、
プロジェクトの作成をする
プロジェクト作成します。
説明入ります?いらないですよね!
各々、適当に作成しちゃってください。
Single View App で良いかと思います。
Storyboardを葬る作業を行う
Storyboard、そんなものはなかったんだ。
そう、Storybordなんて存在しないんだ。
Storybordなんて、、、
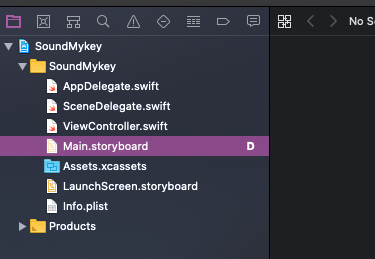
まず手始めにこちらを削除します。
(D は気にしないで)
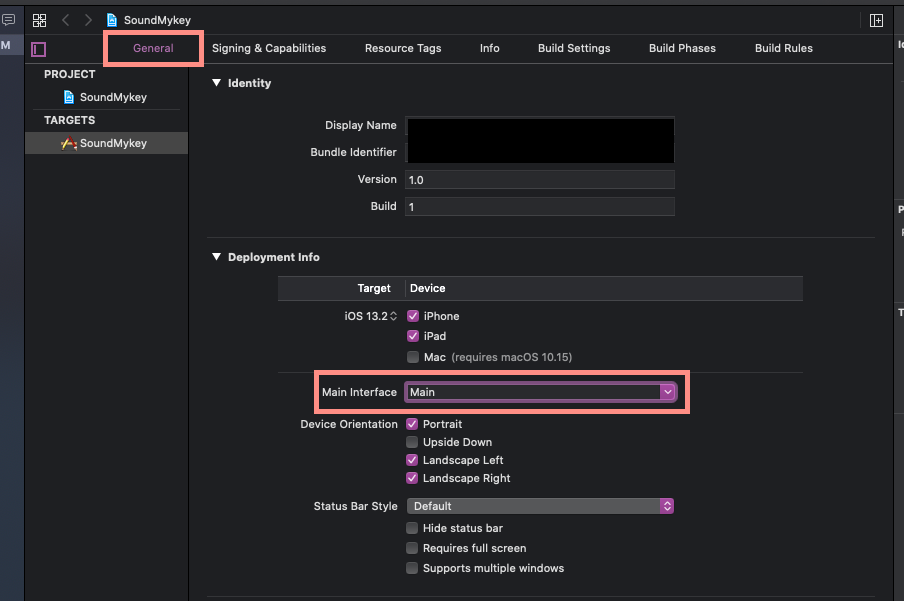
Development Info の Main interface には 削除した storyboard が設定されているので、こちらも削除します。
..sto..ry...board..??
ビルドできるか確かめよう
Xcode11からは、SceneDelegate というものが新たに登場し、プロジェクトを作成するとデフォルトで自動生成されるようになりました。
私もまだ詳しく触り込めていないのですが、同一アプリ内での Multiple display を可能にするために必要になるようです。
SceneDelegate は必須ファイルではないのですが、使用する方針の場合、ライフサイクルイベントが発生した際には SceneDelegate か AppDelegate どちらかが呼ばれます。
その際、iOS13以上の端末では SceneDelegate が呼ばれ、
それ以外では AppDelegate が呼ばれる、という方針があります。
SceneDelegate を使用しない設定、もしくは既存のプロジェクトをXcode11対応したりiOS13以上対応する際は SceneDelegate を使用する設定になっていないので、AppDelegate が呼ばれるということになります。
どちらのパターンも開発上あり得るので、ついでにこのビルド設定もやってみよう。
AppDelegate のみ使用する場合
特に SceneDelegate を使用していかないのであれば AppDelegate を利用するフローをとってみよう。
まずは AppDelegate に記載されている、SceneDelegate 使用しまっせ〜のメソッドを取り除いていく。
これらを削除する。
    // MARK: UISceneSession Lifecycle

    func application(_ application: UIApplication, configurationForConnecting connectingSceneSession: UISceneSession, options: UIScene.ConnectionOptions) -> UISceneConfiguration {
        // Called when a new scene session is being created.
        // Use this method to select a configuration to create the new scene with.
        return UISceneConfiguration(name: "Default Configuration", sessionRole: connectingSceneSession.role)
    }

    func application(_ application: UIApplication, didDiscardSceneSessions sceneSessions: Set<UISceneSession>) {
        // Called when the user discards a scene session.
        // If any sessions were discarded while the application was not running, this will be called shortly after application:didFinishLaunchingWithOptions.
        // Use this method to release any resources that were specific to the discarded scenes, as they will not return.
    }
続いて、Info.plist → Applecation Scene Manifest を削除します。
Scene を利用する際の設定が記載される項目になるので、この場合は削除対象です。
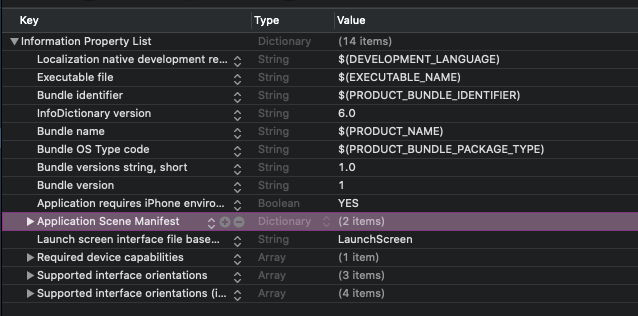
あと SceneDelegate は不要になるのでこれも削除で。
AppDelegate 利用の対応は以上!さぁビルドだ!
といきたいところですが、storyboard の存在を消し去ったので、このままだとプロジェクトが rootViewController を知らない状態です。
AppDelegate にて設定を行いたいのですが、わかりやすいように ViewController の色を変えておこう。
import UIKit

class ViewController: UIViewController {

    override func viewDidLoad() {
        super.viewDidLoad()

        view.backgroundColor = .blue
    }
そしたら最後に AppDelegate に rootViewController を設定する記述をします。
import UIKit

@UIApplicationMain
class AppDelegate: UIResponder, UIApplicationDelegate {

    // これも追記
    var window: UIWindow?

    func application(_ application: UIApplication, didFinishLaunchingWithOptions launchOptions: [UIApplication.LaunchOptionsKey: Any]?) -> Bool {
        // Override point for customization after application launch.

        // 以下を追記
        window = UIWindow(frame: UIScreen.main.bounds)
        window?.rootViewController = ViewController()
        window?.makeKeyAndVisible()
        return true
    }
}
はいビルドの時間。
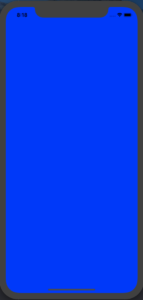
目がいてぇ、、
けど表示されてるので、AppDelegate の設定はこれで問題なさそう!
SceneDelegate の使用を考慮する場合
今度は SceneDelegate を残していく場合。
まずは、はじめに storyboard を削除した時の残り物、
Info.plist → Applicaton Scene Manifest → Scene Configuration...
以下にあるのでこちらも ”-” ボタン押下で削除します。
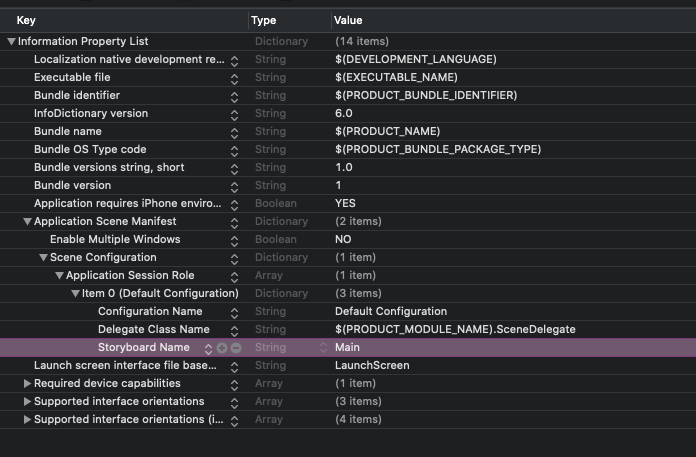
そして rootViewController を設定していきますが、上記で説明した通り、SceneDelegate を利用する際は
- iOS13以上は SceneDelegate
- iOS12以下は AppDelegate
が呼ばれるので、両方カバーしないとどちらかが動作しなくなります(バージョン分岐めんどくs)。
AppDelegate には AppDelegate パートのように記述しますが、iOS12以下でも動作させるため
@available(iOS 13.0, *) を該当箇所に付与する必要があります。
import UIKit

@UIApplicationMain
class AppDelegate: UIResponder, UIApplicationDelegate {

    // これも追記
    var window: UIWindow?

    func application(_ application: UIApplication, didFinishLaunchingWithOptions launchOptions: [UIApplication.LaunchOptionsKey: Any]?) -> Bool {
        // Override point for customization after application launch.

        // 以下を追記
        window = UIWindow(frame: UIScreen.main.bounds)
        window?.rootViewController = ViewController()
        window?.makeKeyAndVisible()

        return true
    }
        @available(iOS 13.0, *)  // 追加する
        func application(_ application: UIApplication, configurationForConnecting connectingSceneSession: UISceneSession, options: UIScene.ConnectionOptions) -> UISceneConfiguration {
        // Called when a new scene session is being created.
        // Use this method to select a configuration to create the new scene with.
        return UISceneConfiguration(name: "Default Configuration", sessionRole: connectingSceneSession.role)
    }

    @available(iOS 13.0, *)  // 追加する
    func application(_ application: UIApplication, didDiscardSceneSessions sceneSessions: Set<UISceneSession>) {
        // Called when the user discards a scene session.
        // If any sessions were discarded while the application was not running, this will be called shortly after application:didFinishLaunchingWithOptions.
        // Use this method to release any resources that were specific to the discarded scenes, as they will not return.
    }
}
SceneDelegate の方には以下のように rootViewController の設定をしましょう。
こちらも該当メソッドには @available(iOS 13.0, *) を記述します。
使用しないものを削除してしまっても問題ないです。
import UIKit

class SceneDelegate: UIResponder, UIWindowSceneDelegate {

    var window: UIWindow?

    @available(iOS 13.0, *)  // 追加する
    func scene(_ scene: UIScene, willConnectTo session: UISceneSession, options connectionOptions: UIScene.ConnectionOptions) {
        // Use this method to optionally configure and attach the UIWindow `window` to the provided UIWindowScene `scene`.
        // If using a storyboard, the `window` property will automatically be initialized and attached to the scene.
        // This delegate does not imply the connecting scene or session are new (see `application:configurationForConnectingSceneSession` instead).

        // 以下を追加する
        guard let scene = (scene as? UIWindowScene) else { return }
        window = UIWindow(windowScene: scene)
        window?.rootViewController = ViewController()
        window?.makeKeyAndVisible()
    }

    @available(iOS 13.0, *)  // 追加する
    func sceneDidDisconnect(_ scene: UIScene) {
        // Called as the scene is being released by the system.
        // This occurs shortly after the scene enters the background, or when its session is discarded.
        // Release any resources associated with this scene that can be re-created the next time the scene connects.
        // The scene may re-connect later, as its session was not neccessarily discarded (see `application:didDiscardSceneSessions` instead).
    }

    @available(iOS 13.0, *)  // 追加する
    func sceneDidBecomeActive(_ scene: UIScene) {
        // Called when the scene has moved from an inactive state to an active state.
        // Use this method to restart any tasks that were paused (or not yet started) when the scene was inactive.
    }

    @available(iOS 13.0, *)  // 追加する
    func sceneWillResignActive(_ scene: UIScene) {
        // Called when the scene will move from an active state to an inactive state.
        // This may occur due to temporary interruptions (ex. an incoming phone call).
    }

    @available(iOS 13.0, *)  // 追加する
    func sceneWillEnterForeground(_ scene: UIScene) {
        // Called as the scene transitions from the background to the foreground.
        // Use this method to undo the changes made on entering the background.
    }

    @available(iOS 13.0, *)  // 追加する
    func sceneDidEnterBackground(_ scene: UIScene) {
        // Called as the scene transitions from the foreground to the background.
        // Use this method to save data, release shared resources, and store enough scene-specific state information
        // to restore the scene back to its current state.
    }
}
はいビルドのお時間ですよー。

目が!
でもビルドできましたね!
iOS12以下の端末でもビルドできると思います。
ちなみに Xcode11 で iOS12 以下端末をビルドする時は Target の設定を該当のiOSバージョンに指定してくださいね。
そうでないと Simulator が出現しませんので。
と、ここまで書きましたが続きは記事を分けます。
ともあれこれで不要なものを取り除いでビルドまでいくことができました。
あれ、何が不要って話してたんだっけ。
s...
まぁいっか。
そう、ここは彼が存在しなかった世界線。
後編
NavigationController, TabBarController の導入をし大枠構成を作っていきます。
storyboard, swift, UIKIt, UINavigationController, UITabBarControllerstoryboard, swift, tips
Posted by Sho
関連記事
Swift: カスタムセルでTableViewを細かくセクション切りする
こんつぁ、しょーです。 さて、TableViewの話をしよう。 超絶シンプルなア ...
【Swift】iOS13のCollectionView、CompositionalLayoutsでモダンにレイアウトする
おはようございます!しょーです! 最近は社内ペアプロをよくやっており、問題解決に ...
【Swift】Alamofire x Codable 綺麗にAPI接続するためのテンプレート
G'day mate、しょーさんです。 梅雨に入りましたね。 バイクに乗れない週 ...
Swift: map()でゴチャついた処理をreduce(into:)でスッキリ
こんつぁ、しょーです。 イテレーション、繰り返し処理の話をしよう。 reduce ...
【Swift】Compositinal Layouts を複数の型に適応させる方法
こんにちは、しょーです。 前回、iOS13からのCollectionViewに使 ...



ディスカッション
コメント一覧
まだ、コメントがありません