【Swift】MKMapView:ピンの吹き出しにCustomViewを設定する
こんにちは、前回に引き続きMapViewのTipsになります。
今回はマップの吹き出しカスタムビューを設定する方法になります。
まず、この吹き出しはCalloutというらしいですね。なので以下ではそう記述します。
デフォルトでもこの機能自体はあるのですが、タイトル、サブタイトル、右側に付与するアクセサリーなどレイアウト等は限定されているため、カスタムビューを設定したいケースが出てきます。その場合にCustomViewをCalloutに設定する方法です。
このカスタムもよく利用するかと思うのでご参考にどぞー。
CustomViewを作成する
まずは設定したいカスタムビューをUIViewを継承して用意します。自分はXibを利用します。
import UIKit

final class PlaceCalloutView: UIView {

    @IBOutlet weak var label: UILabel!
    @IBOutlet weak var imageView: UIImageView!

    @IBAction func buttonDidTap(_ sender: Any) {
        print("button was tapped")
    }
}
ボタンのActionも少し手を加える必要があるのも記述したいので追加しています。
Xibは適当ですがこんな感じ。
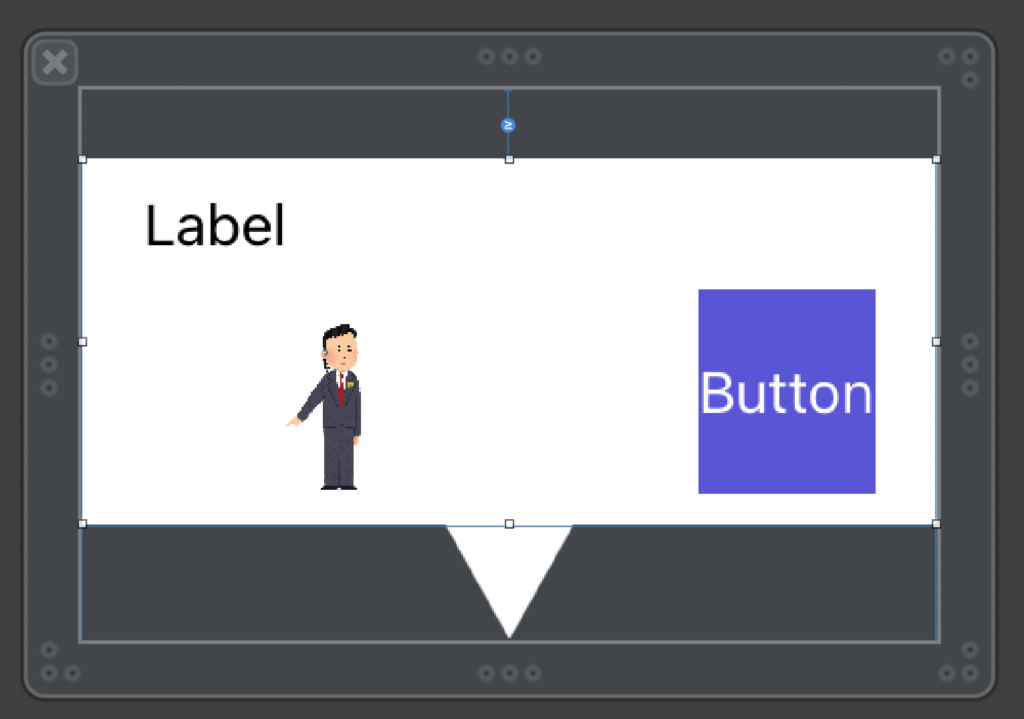
Xibを利用する場合はdelegateメソッドのdidSelectでnibから引っ張ってきて利用するのですが、特に明示的に記述しない場合このxibで設定したframeサイズがそのまま適用されます。
そしてcellのようにself-sizingを行ってくれるわけではないので、動的にcalloutサイズを変えるというのが困難です。
例えば、Labelの行数指定が最大2行で、改行した時にサイズもその分拡張する、というのは実現できます。
その場合は2行になった場合、つまりViewの最大サイズというのをxibでレイアウトしておきます。(2行ならlabel.height * 2分を設定する)
あとは改行設定をし、 topの制約に ≧ 0 を設定しておけばその範囲内で動的に可変してくれます。
Annotation(ピン)にCalloutを設定する
実装していきます。
MKMapViewDelegate に didSelect, didDeselect があるのでAnnotationが選択された場合の処理を記述します。
Annotationの加工は以下を見てみてください!
【Swift】MKMapView:ピンに画像やCustomViewを設定する
private func setAnnotations() {
// set an annotation that changes its image
let annotation = MKPointAnnotation()
annotation.coordinate = CLLocationCoordinate2D(latitude: 35.68493104294112, longitude: 139.75273538025138)
mapView.addAnnotation(annotation)
// set an annotation that Custom View is used
mapView.register(PlaceAnnotationView.self, forAnnotationViewWithReuseIdentifier: MKMapViewDefaultAnnotationViewReuseIdentifier)
let tokyoDome = PlaceAnnotation(index: 2, name: "東京ドーム", image: R.image.im_sp()!,
latitude: 35.70580548548312, longitude: 139.7517604413992)
tokyoDome.coordinate = CLLocationCoordinate2DMake(tokyoDome.latitude, tokyoDome.longitude)
let jinbochoSt = PlaceAnnotation(index: 3,
name: "神保町駅 ー 神保町は古本いっぱい楽しいうわーいうわーいうわーいうわーいうわーいうわーいうわーいうわーいうわーいうわーいうわーいうわーい",
image: R.image.im_sp()!, latitude: 35.69591725953706, longitude: 139.75773500398736)
jinbochoSt.coordinate = CLLocationCoordinate2DMake(jinbochoSt.latitude, jinbochoSt.longitude)
mapView.addAnnotations([tokyoDome, jinbochoSt])
}
func mapView(_ mapView: MKMapView, didSelect view: MKAnnotationView) {
// 自身の位置は無視
if view.annotation is MKUserLocation { return }
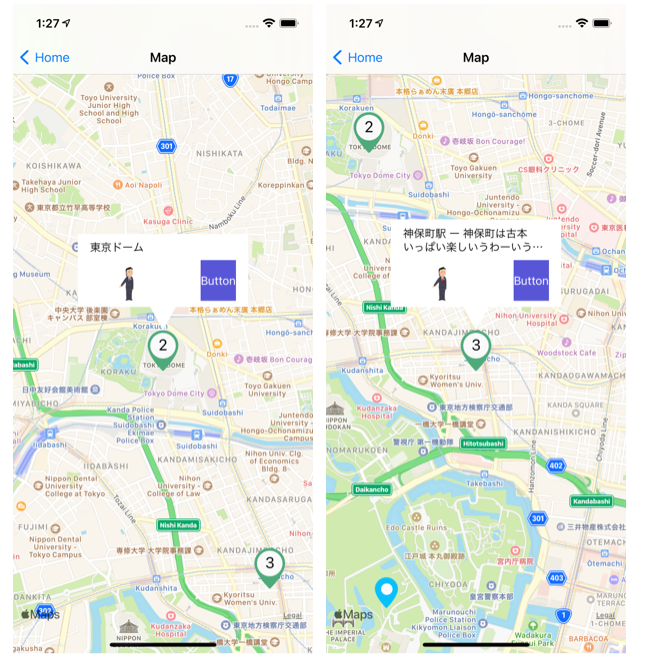
let calloutView = R.nib.placeCalloutView.firstView(owner: nil)!
if let annotatioin = view.annotation as? PlaceAnnotation {
calloutView.label.text = annotatioin.name
calloutView.imageView.image = annotatioin.image
}
// make inset because the callout's bottom focuses on the center of annotation
let inset = PlaceAnnotationView.height / 2
calloutView.center = CGPoint(x: view.bounds.size.width / 2,
y: (-calloutView.bounds.size.height / 2) - inset)
view.addSubview(calloutView)
mapView.setCenter((view.annotation?.coordinate)!, animated: true)
}
func mapView(_ mapView: MKMapView, didDeselect view: MKAnnotationView) {
if view.isKind(of: MKAnnotationView.self) {
for subview in view.subviews {
if subview.isKind(of: PlaceCalloutView.self) {
subview.removeFromSuperview()
}
}
}
}
Calloutの下部がAnnotationの中心にフォーカスされてしまうため、Annotation.height / 2 分インセットをかけてあげるといい感じになります。
didDeselectはマップをタップするとCalloutが閉じるような処理を記述しています。
これで表示はこんな感じ、いいですね。
Callout上のボタンが反応するようにする
このままだとCalloutにボタン等のイベントを設定している場合、タップするとCalloutが閉じてしまいます。
なので hitTest を override してボタンにアクションが行くように設定してあげます。
ここで設定するのはAnnotation方に設定します。(ちょっと調べきれていない)
import UIKit
import MapKit

final class PlaceAnnotationView: MKAnnotationView {

    @IBOutlet weak var label: UILabel!

    static let height: CGFloat = 53

    override init(annotation: MKAnnotation?, reuseIdentifier: String?) {
        super.init(annotation: annotation, reuseIdentifier: reuseIdentifier)

        centerOffset = CGPoint(x: 0, y: -frame.size.height / 2)
        loadFromNib()
    }

    required init?(coder aDecoder: NSCoder) {
        super.init(coder: aDecoder)

        loadFromNib()
    }

    private func loadFromNib() {
        let nib = R.nib.placeAnnotationView
        guard let view = nib.instantiate(withOwner: self).first as? UIView else { return }
        view.frame = bounds
        addSubview(view)
    }

    override func hitTest(_ point: CGPoint, with event: UIEvent?) -> UIView? {
        let hitView = super.hitTest(point, with: event)
        if hitView == self {
            return nil
        }
        return hitView
    }

    override func point(inside point: CGPoint, with event: UIEvent?) -> Bool {
        var isInside = self.bounds.contains(point)
        if !isInside {
            for view in self.subviews {
                isInside = view.frame.contains(point)
                if isInside {
                    break
                }
            }
        }
        return isInside
    }
}
こうすることでCallout上のボタンにもアクセスできるようになるはずです。
終わりに
2回に分けてMapViewに関して説明しました。
結構案件で実装する場合はデザインを独自で用意するケースがあると思うので、参考になれば嬉しいです!
もう夏ですね、世間は騒がしいですが頑張って今年も乗り切っていきましょう。